In this post we’ll be going over everything you need to know to start a photography blog in 2026.
No matter your skill level having a photography blog is a great way to showcase your work; especially for a photography business. It can even help you book gigs depending on your niche.
Whether you just want to start with a simple blog or need a complex site; WordPress is the best option. There are plenty of tools to create your photography blog using WordPress and it can grow as you do. WordPress gives you complete control over your site and you own all of your content. This makes learning WordPress a better investment in the long term.
Key Takeaway: To start a photography blog in 2026, get a domain and hosting, use self-hosted WordPress (WordPress.org), pick a lightweight theme like KadenceWP or GeneratePress, install essential plugins, create key pages, and focus on quality content and promotion. Use Cloudflare for speed and grow your audience with SEO + AI SEO.
In this post I’m going to show you how to start a photography blog using WordPress for beginners. As a bonus I am also going to show you how to find a WordPress theme and the best WordPress plugins for your blog.
Keep in mine we will be using the self-hosted WordPress.org version of WordPress in this article. Not to be confused with more beginner friendly WordPress.com which offers more limited functionality with less options. Professional photographers will want to use a self-hosted version of WordPress as their blogging platform.
Here’s how to create a photography blog step-by-step:
How to Start a Photo Blog in 4 Steps
- 1. Domain Name + Hosting
- 2. WordPress Photography Themes
- 3. Essential WordPress Plugins for Your Photo Blog (FREE)
- 4. Create Essential Pages for Blog
- How to Actually Stay Consistent (My Secret Weapon)
- How to Use CloudFlare as a Free CDN
- Next Steps: Growing Your Photography Blog
- Frequently Asked Questions
- Conclusion
1. Domain Name + Hosting
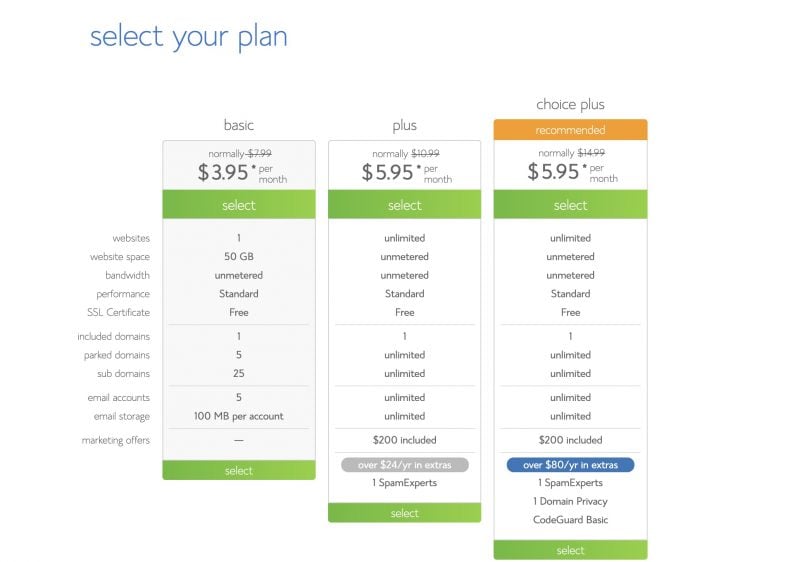
One of the simplest and cheapest ways to start a photography blog is to use WordPress with BlueHost (Cloudways is also a great host.) It’s a no brainer with its low up front cost of $3.95 a month for web hosting and included domain name.

BlueHost offers a few plans but if you’re just starting out the basic plan should be more than enough.
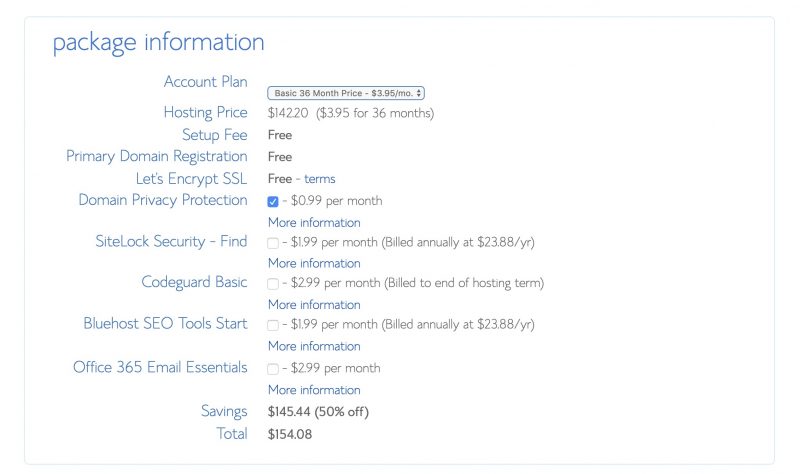
This will include a free domain name and an SSL certificate. Keep in mind I never recommend paying for an SSL certificate since it costs hosting providers nothing to add to your site.
I see a lot of people get hung up on picking a blog name. If you need help figuring out a name you could try a domain name generator for name ideas. Remember it’s relatively simple to change domain names later so don’t get hung up on the small stuff.
For our example I will be registering andyfeliciottiphoto.com.
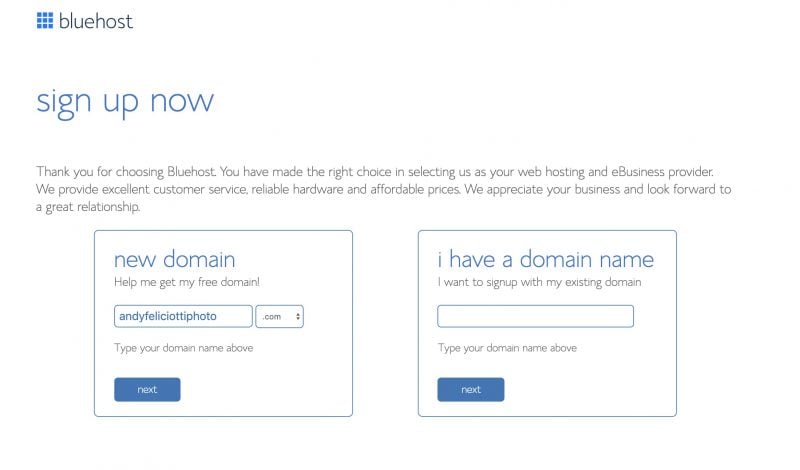
On the sign up page BlueHost offers a few additional services, in my opinion the only one you need is domain privacy. Domain privacy is helpful since it hides your home address from anyone looking up your site. The Codeguard and Sitelock services shouldn’t be needed so uncheck those to save a few dollars a month.
After signing up for your plan BlueHost will automatically setup WordPress for you and have you select a theme.
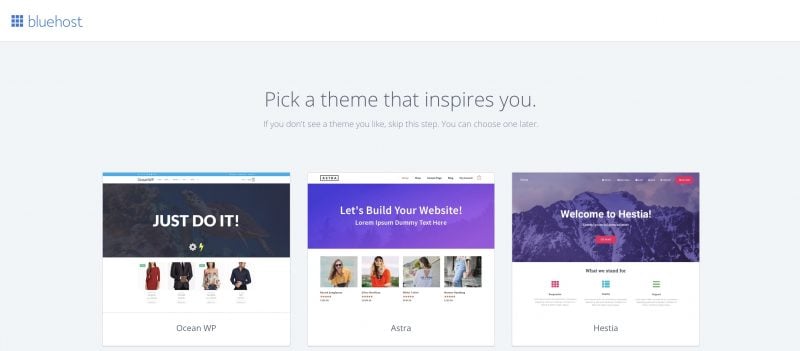
I recommend starting with KadenceWP but we’ll cover choosing a WordPress theme in detail in the next section.
And boom you’re done! Bluehost will handle the WordPress installation automatically and take you to your WordPress admin. Once in the WordPress admin BlueHost will also walk you through the basic WordPress settings. Remember you can change anything on your WordPress site at any point so don’t get nervous making changes.
2. WordPress Photography Themes
While Bluehost will set you up with a starter theme, there are better WordPress themes for photographers.
Some themes become outdated over time. That can mean missing features or even bugs. To avoid this, stick with a theme that is popular, well supported, and lightweight. My top picks are KadenceWP and GeneratePress.
I also recommend using WordPress’ built-in block editor, Gutenberg (also known as the block editor.) It makes creating complex pages simple with drag-and-drop “blocks.” In the past you needed tools like Elementor or Visual Composer. Today, Gutenberg is powerful enough on its own and can be expanded with plugins that add more block options. I’ll share some of my favorite block plugins below.
Both KadenceWP and GeneratePress are free, with premium versions available when you want to grow your site further. The free versions are more than enough to get started.
KadenceWP

KadenceWP Theme + Kadence Blocks: KadenceWP is a great framework to build your site and they have plenty of free starter templates (and even the ability to use AI to generate a starter theme) to choose from. Basically a starter template automatically applies settings to KadenceWP to mimic a different look. The Kadence Blocks plugin also provides plenty of unique blocks for your photography.
GeneratePress
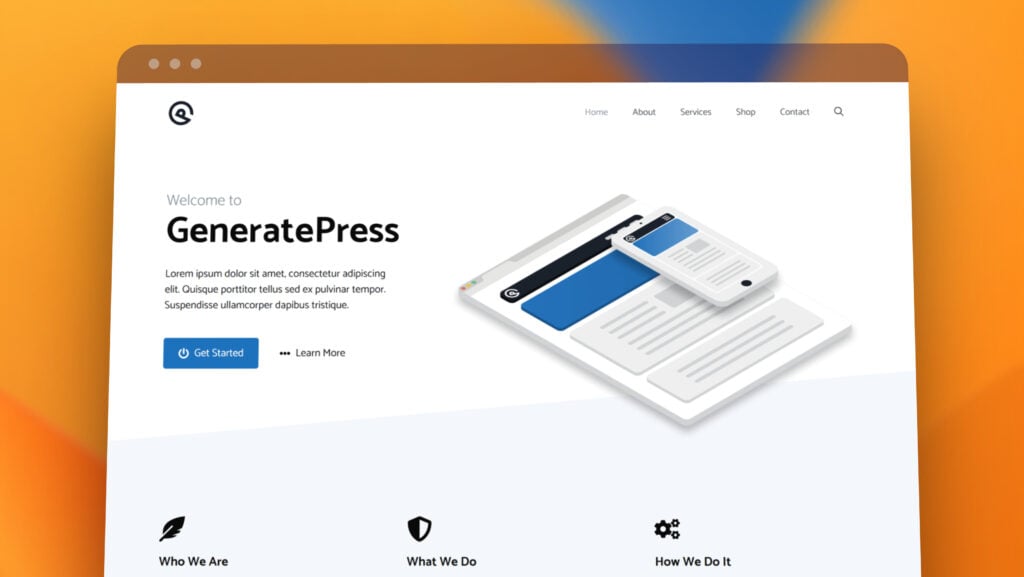
GeneratePress Theme + GenerateBlocks: At this point I build most of my new sites using GeneratePress and GenerateBlocks. If you are more technically inclined I find this theme to be more lightweight and less features so you can focus on keeping your site lean.
3. Essential WordPress Plugins for Your Photo Blog (FREE)
Bloggers know that the huge benefit of using WordPress is plugins. But at the same time it can be cumbersome to find good WordPress plugins. If you aren’t familiar with WordPress plugins think of them like apps for your blog. Basically they expand functionality of your blog in many ways. It’s important not to overload your site with plugins if you want to keep it fast and working correctly.
There are premium versions of each of these plugins that offer more features but for the sake of this post I’ll be focusing on free WordPress plugins. If you want to explore what plugins are availalbe for WordPress I recommend going to WordPress.org.
Speed: WP Super Cache
One of the most important aspects of your WordPress blog is speed. WordPress offers plenty of performance plugins but I recommend using WP Super Cache. It’s simple to setup and will speed up your blog immensely. If you have the budget thought WP Rocket is my favorite performance plugin for WordPress.
SEO: Yoast SEO
One huge aspect of having a website is SEO (Search Engine Optimization) and Yoast SEO gives you all of the controls you need for your WordPress blog. This includes the ability to edit meta title tags and descriptions. Additionally Yoast will generate a sitemap for your blog so you can put it in Google webmasters for indexing. Read more WordPress SEO tips that I wrote on my other blog SmartWP.
Security: Wordfence
Since WordPress powers 43% of the net it’s a huge target for attacks. Installing a WordPress security plugin is essential to keeping your site safe. WordFence covers all aspects of WordPress security including your login page and protecting against exploits.
Pinterest Pin Button Hover: jQuery Pin It
Of course photography plays a large part on social media sites and Pinterest is no exception. Having a simple way for visitors to share your images can help you get more traffic. The jQuery Pin It plugin will add a pin button to your images in posts. If you’re looking for a paid plugin that handles social shares and Pinterest buttons I love Novashare.
This is a fantastic addition if you’re sharing large posts with lots of images such as a wedding gallery or sharing a larger travel photography blog post.
Contact Form: Ninja Forms
There are plenty of options to built forms in WordPress but have found Ninja Forms to be easiest to use. Having a contact form is essential on your site if you plan on using it for lead generator.
If you’re building a simple contact form or want to include additional details like date of an event Ninja Forms will let you create it all. Best of all it’s a simple drag and drop editor making it easy to build forms.
4. Create Essential Pages for Blog
Creating pages on your WordPress blog can greatly vary depending on what theme and page builder you have installed. If you don’t have a page builder you most likely are using Gutenberg or the Classic WordPress editor. At the end of the day all of these editors will allow you to achieve the same effect. For people just starting out I highly recommend using Gutenberg when building a new website (this will be enabled by default).
To create a page in WordPress simply login to WordPress and use the admin sidebar to go to “Pages” > “Add New”.
Creating a Contact Page
If the main goal of your blog is to book more clients than having a contact page is essential; especially for wedding photographers.
One of the biggest mistakes I see about contact pages is only having a form and nothing else. It’s essential to include a blurb of why someone would be contacting you. This can include an overview of the services you offer such as “engagement photos, weddings, etc”.
Now that you have written why someone would contact you, add a form to the page using Ninja Forms which I recommended above.
This can be as simple as asking for someone’s name, email and their message. But if you are more organized adding things like event date or a service selector will help you funnel your contact requests.
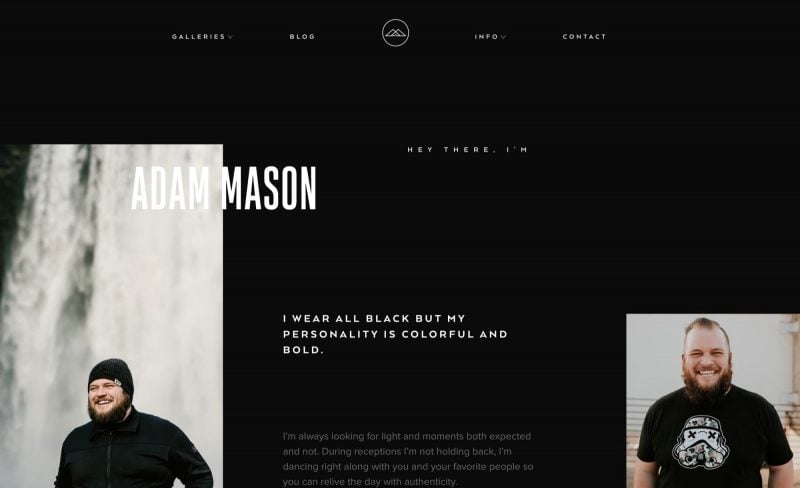
Making an About Page for Your blog
Next, create an About page that introduces you to readers. Share who you are, your background in photography, and what drives your work. Mention awards, press, or exhibitions to build trust. Add a few personal details so people feel connected.
Include links to your social accounts so visitors can follow your latest updates. If you need help writing this section, check out this guide on how to write a bio.
If you need inspiration my buddy Adam Mason includes fun facts on his about page to give a deeper connection to prospect clients.
How to Actually Stay Consistent (My Secret Weapon)
Let’s be honest, the hardest part of starting a photography blog isn’t getting it online, it’s writing the posts. You’d probably rather be out taking photos or editing them in Lightroom.
For years, I struggled to keep my blog updated. I’d post three times in one week and then ghost my audience for months. That is a huge mistake for SEO. Google wants to see a steady heartbeat of content to trust your site.
My solution is autoblogging and using AI for the first draft. I know AI can be controversial, but I believe you can still use it while adding your own stories, opinions, and values.
I created a tool called RightBlogger to solve this problem. It includes an autoblogging feature that writes and schedules posts based on your keywords. You can plan months of content in one session. In my view, it is the best AI article writer and much easier to use than ChatGPT.
If you want to take it further, RightBlogger also offers an autoblogging tool that can draft posts on a schedule. It’s not a replacement for writing your own content, but it’s useful for generating first drafts or keeping a consistent publishing cadence when you’re busy shooting.
It connects directly to WordPress, so you don’t have to mess with copy-pasting. Even if you just use it to create first drafts that you tweak with your own photos later, it’s a massive time-saver. Consistency is the secret sauce to ranking, so find a workflow that keeps you publishing even when you’re busy.
How to Use CloudFlare as a Free CDN
First you might ask yourself what is a CDN? A content delivery network or CDN is a network of servers that delivers images (and site assets) for your website.
Since you’ll have a lot of large images and photos on your site a CDN can greatly improve your website’s speed.
Basically it makes your website faster.
And who doesn’t love that!
Since PageSpeed is one of the factors Google ranks you on it’s even more important.
One of the largest CDN services is CloudFlare. Best of all it’s simple to set up, free, and even adds security to your website also.
To do this just sign up for CloudFlare. After signing up CloudFlare will scan your DNS records and you’ll be given DNS name servers. These can be entered in your BlueHost account to replace your DNS. Just ensure that the DNS records CloudFlare scanned and the ones in your BlueHost account match since sometimes CloudFlare can miss entries.
After the DNS name servers are pointed to CloudFlare all of your traffic will go through CloudFlare servers.
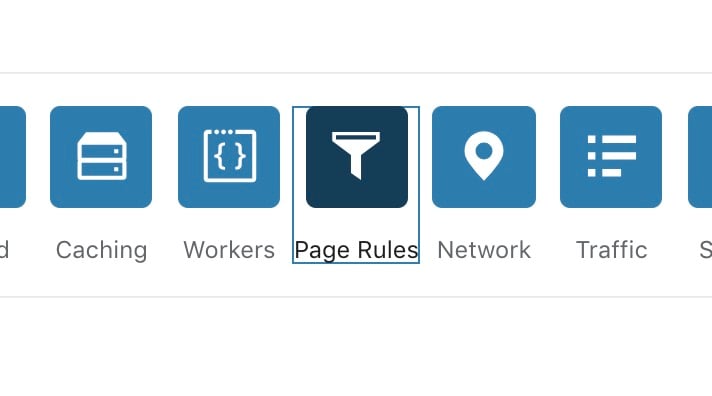
Here you’ll want to create a page rule.
On this page you can create up to 3 free page rules but you will only need 1 to get the most out of it.
Just replace my domain name with yours and add the same settings in the rule.
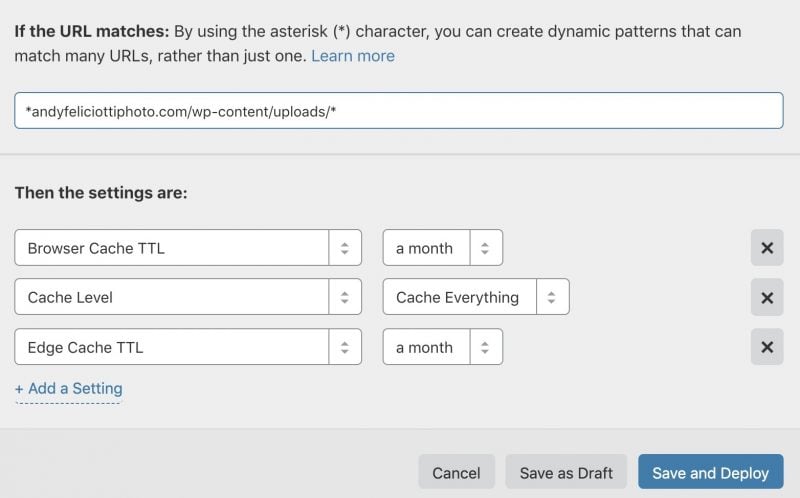
What this will do is server all of your wp-content/uploads content from CloudFlare and cache it for a month. From my experience this is a fantastic way to speed up images on your site for free.
After it’s deployed you’re good to go! and it’s as simple as that.
Next Steps: Growing Your Photography Blog
Now that you’ve established your photography blog, it’s time to focus on creating quality content and building your audience. Here’s how to continue your growth journey:
Generate Compelling Post Ideas
Creating engaging content consistently is key. Explore various topics such as photo techniques, gear reviews, and personal stories to keep your audience interested.
- Brainstorm new topics using ChatGPT or with a Blog Post Idea generator.
- Analyze popular photography blogs for inspiration.
- Tap into trending topics on social media platforms.
Keyword Research
Optimize your content for search engines to improve visibility. Use keyword research to find out what your audience is searching for and tailor your posts accordingly.
- Utilize tools like RyRob’s Keyword Tool, Google Keyword Planner and Answer The Public.
- Focus on long-tail keywords relevant to your photography.
- Incorporate keywords naturally into your content (but don’t over do it)
Creating Engaging Content
Your blog titles play a big role in attracting readers. Make sure your headlines are both enticing and relevant. Additionally a well-organized post enhances readability and keeps readers engaged.
I often see people who aren’t used to writing online content miss this step. It is so important to break down your content into easy-to-read sections. This means using short paragraphs of two to three sentences, clear formatting, and other tools so users can quickly scan your page and find what they are looking for.
- Use subheadings and bullet points.
- Include images and videos to complement your text.
- Maintain a logical flow throughout your post.
Write and Edit Carefully
High-quality, error-free content is essential for maintaining credibility. Take the time to write and revise your posts thoroughly. Use grammar checkers and readability tools to improve your writing. Edit for clarity and conciseness to ensure your message is clear.
How to Promote Your Blog
To grow your audience, actively promote your blog through various channels. One effective strategy is to share your posts on social media platforms. Engaging with your audience through comments and messages can also foster a sense of community and loyalty among your readers.
Additionally, collaborating with other bloggers and influencers can help you tap into their follower base, further expanding your audience and enhancing your blog’s credibility. Plus collaborating with others is a great way to build backlinks to your site.
By following these steps, you’ll be well on your way to growing a successful photography blog. Additionally, tools like RightBlogger (which I built) can help speed up your content creation and promotion process, making it easier to achieve your goals.
Frequently Asked Questions
Do I need to be a professional photographer to start a photography blog?
No, you don’t need to be a pro. Many people start with a hobby or passion for photography and grow their skills along the way. Share your progress, personal style, and lessons learned. Readers often enjoy a real-life journey.
What should my photography blog focus on?
Pick what feels most natural to you. Some people write tips for beginners, others share editing tricks, gear reviews, or photo stories. You can focus on a niche, like travel or portraits, or share a mix. The main point is to stay true to your voice and interests.
Which platform is best for a photography blog?
Most use WordPress because it’s flexible and has lots of themes for photo-heavy sites. Squarespace and Wix are also popular with beginners because setup is easy and templates look sharp. Choose one that fits your budget, comfort level, and how much control you want over your site.
How do I get people to visit my blog?
Post often and share your posts on social media, especially Instagram and Pinterest, since they’re photo-focused platforms. Use keywords in your titles and posts to help people find you through Google. Comment on other photo blogs to connect with readers and fellow bloggers.
What’s the best way to display photos on my blog?
Use image galleries, sliders, or full-width images for a clean, professional look. Compress your photos before uploading to keep load times fast. Make sure your site layout works well on phones, since lots of readers use their mobile devices.
How do I get my travel blog cited in LLMs like ChatGPT?
Generative Search Optimization (GEO) lays on the same principles of normal SEO. Publish in-depth, well-structured articles with clear headings and schema markup so AI can easily parse them. Keep content accurate and up to date, and build authority with backlinks from trusted travel sites. Add trust signals like author names and sources. The more visible and authoritative your blog is on the web, the more likely it is to be cited in LLMs.
Conclusion
You now have your own photography blog on your own domain!
Now that you have a photography site you can start to write blog content. Whether it’s photography tips, travel ideas, or details about projects you’ve shot there is a huge range of topics a photography blogger can cover in this blog niche.
Having a photography website can be a powerful tool for sharing your work. I especially love writing and sharing travel guides after traveling. From wedding photography to Photoshop tutorials there is so much you can write about with a new blog.
If you don’t know where to start I would recommend setting up a homepage and a contact page.
Once you have a successful photography blog you can work on monetization. There are plenty of ways to monetize a blog including sponsored posts, affiliate programs, and advertisements.
After you get sense for how you want your WordPress blog to feel you can always hire a WordPress developer for deeper customization. Services like Fiverr and Codeable give easy access to premium WordPress services.
If you have any question about setting up your photography blog leave them in the comments below.

This article is fantastic and awesome. Thanks a lot for sharing.
Happy to help!