One of my favorite features Canon has been adding to their cameras is the ability to record timelapses all in-camera. This makes it extremely easy to just setup your camera and get great results. The Canon R5 has a fantastic timelapse mode that can record up to 8K resolution.
Even if you’re trying to achieve a holy grail (day to night) timelapse you’ll be able to with the R5’s built-in modes.
If you’re a more experienced timelapse photographer the Canon EOS R5 includes a built-in intervalometer. This allows you to take photos at preset intervals all without an additional remote.
In this article I will be going over the built-in timelapse mode in the Canon R5 and how to get great results.
The Canon EOS R5 timelapse mode allows you to record timelapses in 1080p, 4K, and 8K resolution. After your timelapse is over it’s automatically compiled into an MP4 video all in-camera.
How to Setup a Timelapse with Canon EOS R5
Now let’s get started.
First you’ll need a sturdy tripod or somewhere to place your camera so it doesn’t move. Secondly an interesting subject like a sunset, clouds, or traffic.
After you have those you’re ready to capture a timelapse!
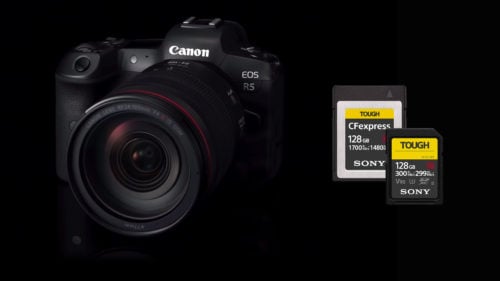
Need a memory card for your R5?
Read: Canon R5 memory card recommendations
Now that we have an interesting subject and tripod I’ll go over a few settings you’ll need to change to get the best results.
By default when filming a timelapse on the Canon R5 the ISO will automatically move between ISO 400-26500. This will cause us trouble since low light scenes will introduce a lot of noise at higher ISO ranges
Luckily we can change the max ISO speed when recording a timelapse on the R5. To do this set the camera to movie mode and head to ISO settings in the R5 menu (Shoot2) and find “Max for Auto” with a little timelapse symbol before it. Here you can set the max ISO from 400 to 26500, I recommend setting the max timelapse ISO to 400 so we have a cleanest image possible.
Now that we have our max ISO set we can setup our timelapse.
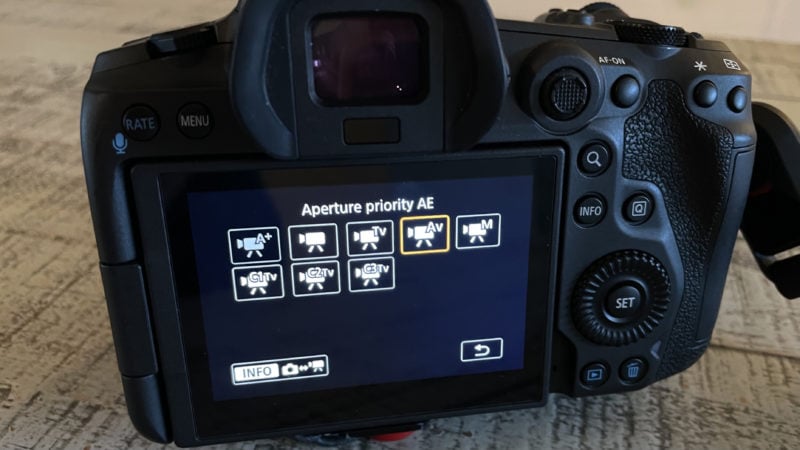
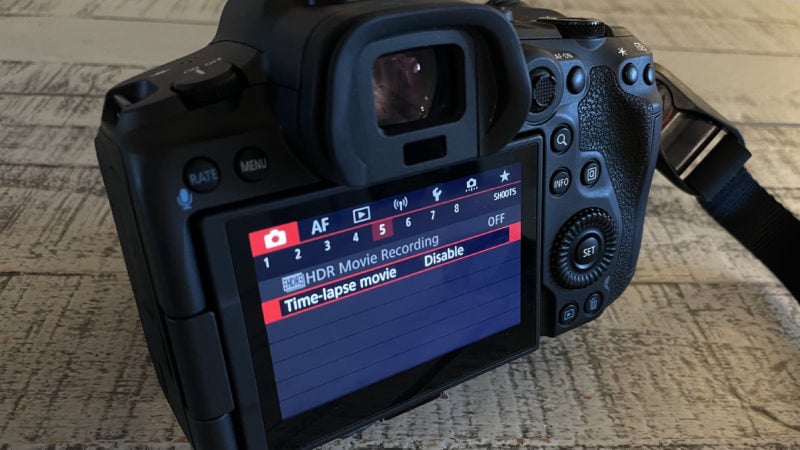
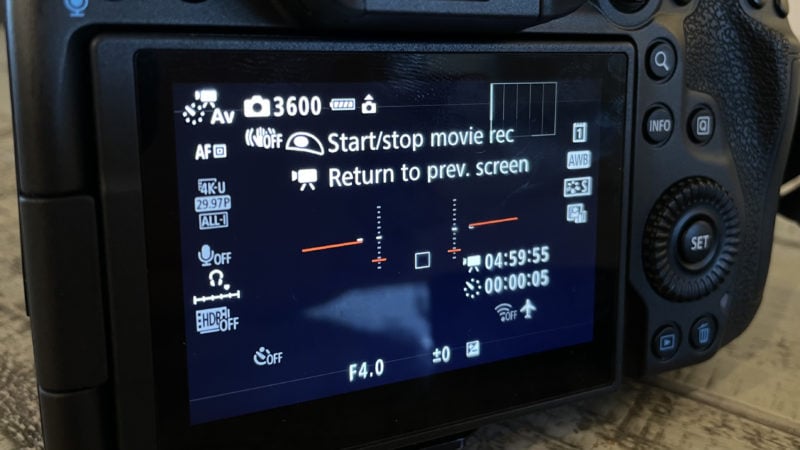
I recommend using movie aperture priority (Av) mode. Once you’re on that you’ll be able to enable timelapse shooting in the Shoot5 menu. Here is a quick break of the settings I recommend.
Recommended Canon R5 timelapse settings:
- Mode: Movie Aperture priority (~f/8)
- Time-lapse: Enable
- Interval: 00:00:05
- No. of shots: 3600
- Movie rec. size: 4K
- Auto exposure: Each frame
- Screen auto off: Enable
- Beep as img taken: Disable
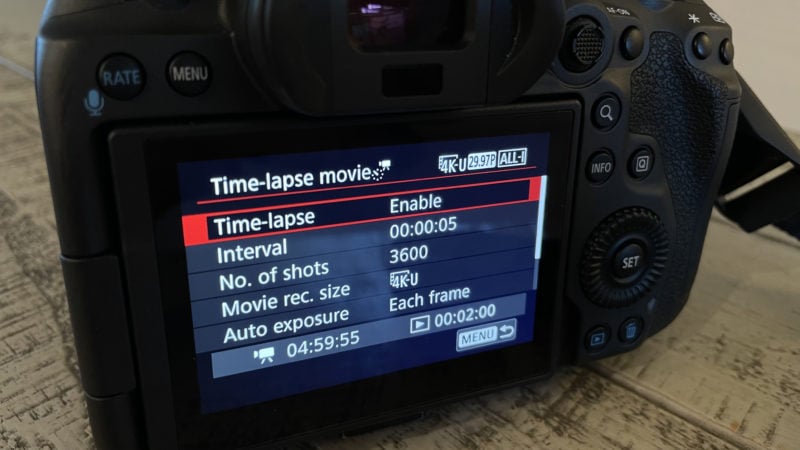
In the Canon R5 timelapse mode you can take up to 3600 photos at a minimum of 2 seconds apart. The menu will tell you how long your timelapse will go as well and the resulting video length.
If you’re going to film a short timelapse I recommend doing a lower time like 2 seconds while if you want one that is a few hours you’ll want to have a longer interval.
Of course you can stop your timelapse at anytime by hitting the record button on the camera so I typically keep the photo count to the max of 3600.
You can set the camera’s auto exposure for each frame or to match the first frame. Auto exposing for each frame will allow you to capture changing lighting conditions like day-to-night timelapses all without flickering so it’s a no brainer to use that option.
After enabling timelapse mode and configuring the settings hit the red record button on top of the camera then the shutter button to start the timelapse. You should see the screen turn off/on as its capturing images.
After 10 seconds the screen should automatically turn off if “Screen auto off” is enabled. You can also turn the R5’s screen on/off during timelapse recording by hitting the info button, just be careful when interacting with the camera since any nudge can ruin your timelapse.
After stopping the timelapse the R5 will quickly generate your video and you can preview it directly on the camera.
I do wish you could do C-LOG or RAW recording for timelapses but sadly the R5 doesn’t have the option to do that. If you need more fidelity you can use the R5’s built-in intervalometer and software like LRTimelapse to capture a more “professional” timelapse. That being said I have found the results from the built-in functionality to be excellent. Especially if you’re just trying to capture something quick to include in a travel video.
The Canon EOS R5 battery will last a couple of hours while timelapse shooting. Sadly you cannot use USB-C charging to charge the camera while recording. If you need to film a longer timelapse you’ll need Canon’s dummy battery adapter to power the camera.
Here’s another example of the Canon R5 timelapse feature with a day to night timelapse. This was shot using -1/3 exposure compensation on aperture priority using the built in timelapse mode.
Here’s another example of a day to night timelapse using the Canon R5.
Conclusion
I hope you found this guide to the Canon EOS R5 time-lapse mode helpful! No matter if it’s for sunset, traffic flow, or just to see time pass by the R5 time-lapse mode is a lot of fun to use.
If you have any questions let me know in the comments below.
Thx! Simple and helpful. I just needed a basic guide (so I didn’t have to read my manual lol). This was perfect. I’ll head out n give the night sky a try when the snow stops!
This is a great guide, thanks. I’m going to try it out next weekend. How did you get the zoom in / out effects? Was that in software in post? Or some sort of rail or auto zoom device?
Thanks. M
Hey Mark, most video editing software will let you add it in. Typically it’s called “Ken Burns”, you can’t do the zoom effect in camera though sadly.
Hi Andy,
Thank you for the very informative article. I’m OMW down under for the total solar eclipse. This is not my first one! I usually shoot stills but I figured I’ll try video as well this time. I will have 2 cameras (R6 for stills and R5 for video with 600mm lenses) on a guided setup (Benro Polaris). I love the idea of the time-lapse but I want the video running normally after totality (<57 secs). Is there a way to automate this shift from time-lapse to straight video and back again without fiddling with the camera?
Thank you
Jas
That would be amazing, Jas but sadly there isn’t to my knowledge, you could just do 1 photo per second for the timelapse settings and speed up the before/after.
Hi Andy
Your guide did a positive difference to a great result – thank you 🙂
I came across your article doing google search for R5 timelapse. I’ve had my R5 for less than a month and still learning, huge difference and amazing tech leap forward from my 12 year “old buddy” EOS 5D MKII.
I have experimented with time lapse before and particular “the holy grail” via the kickstarter witharsenal.com, it was exciting to be part of pioneering and wanted to contribute. I didn’t get it to work as I saw others did timelapse.
So, when I did some studying with the R5 and wanted to give it a go with low expectations and was blown away, silky smooth transition day to night.
As you mention in the article, it would be great to get the RAW version and since it is single frames compiled to a movie, it assume it should be possible to “jail break” the firmware on that, not that I want to try but maybe guys over at magiclantern.fm could if they are still in business.
Thanks again and all the best
Mike / Denmark
Mike I’m so happy to hear that it worked great for you! And I totally agree the built in mode is oddly so good, just wish it did RAW! Maybe in Mark II and another Canon camera they’ll do that.
Thanks for the article Andy, some very useful tips. I have used the timelapse feature in the past but only basically, no auto exposure. Going to hopefully try that today! One thing I did find was that everywhere online it says you can’t charge while shooting, or you can’t charge any battery other than the LP-E6NH, but I have always found that a PD power bank or just my Anker MacBook charger does both. It’s been great, I can shoot with the built-in timelapse and PD just powers the camera. After 5-6 hours I come check and the battery is still full. Maybe it isn’t charging the battery, but the PD is providing all the power to run the camera. Hard to know but I have always come back to a full battery. I do now have the Canon R5 C too which doesn’t have the timelapse movie mode and it is actually something I really am annoyed about since having a two camera timelapse setup can add lots of flexibility. Just a little bummed out.
Glad it helped Charles, that’s awesome about the power delivery! I don’t have a R5 C but I recall from reviews (maybe firmware update) that there was a way to do like 1 FPS recording so you technically can make a timelapse using that (I could be wrong), just tried searching and couldn’t seem to find details.
Thanks so much for the guide.
Regarding your comment on needing a dummy battery:
I’ve had the R5 for around 6 months and finally got around to testing how long I could go on a timelapse while plugged into a PD (power delivery) USB C power bank.
I was shooting with the camera in intervelometer mode and not the built in mode that brought me to your article and that I’ll try tonight.
I had eco mode on but also just closed the LCD screen so it didn’t keep turning off and on.
I set up for the Perseids meteors and started shooting at just before midnight.
When I got up at 6:30 am, the camera was still shooting away and the battery showed full!
I upgraded to the R5 hoping for the ability to charge while shooting but everything I read implied that you couldn’t, well you can apparently 🙂
Now I need to try the built in timelapse mode because compiling 1000 images into a clip to see if it came out ok is a very long process and I ended up with flickering.
I’m pretty excited to continue to learn. Depending on when you see this, you may be able to see some of my Astro attempts and other messing about.
Thanks again for the article.
Instagram.com/daveybphotos
Thanks for the tip! Figured it would deplete pretty quickly. Hoping the timelapse mode also works well on battery!
Am I missing how to focus? Manual?
Great point Kev, yes I’d recommend manually focusing.