If you’re new to flying a drone and want to get the most out of your footage you’re in the right place. Over the course of using multiple drones and filming countless videos I’ll be sharing with you my favorite drone videography tips!
Every photographers knows the importance of getting high quality footage from their gear and a drone is no exception. Here are 10 tips to improve your drone videos (and drone photos as well!)
Drone Filming Tips
- 1. Change Your Gimbal Sensitivity
- 2. Use Simple Angles While Filming
- 3. Use Manual Camera Settings
- 4. Use ND Filters on Your Drone
- 5. Use D-Log or D-Cinelike Color Profiles
- 6. Know Where to Fly Using AirMap
- 7. DJI Mavic Pro Tip: Use Portrait Orientation
- 8. Enable Overexposure Warning
- 9. Enable Grid Lines
- 10. Shoot Using Cinematic Mode
Improve your drone videography with these 10 drone filming tips:
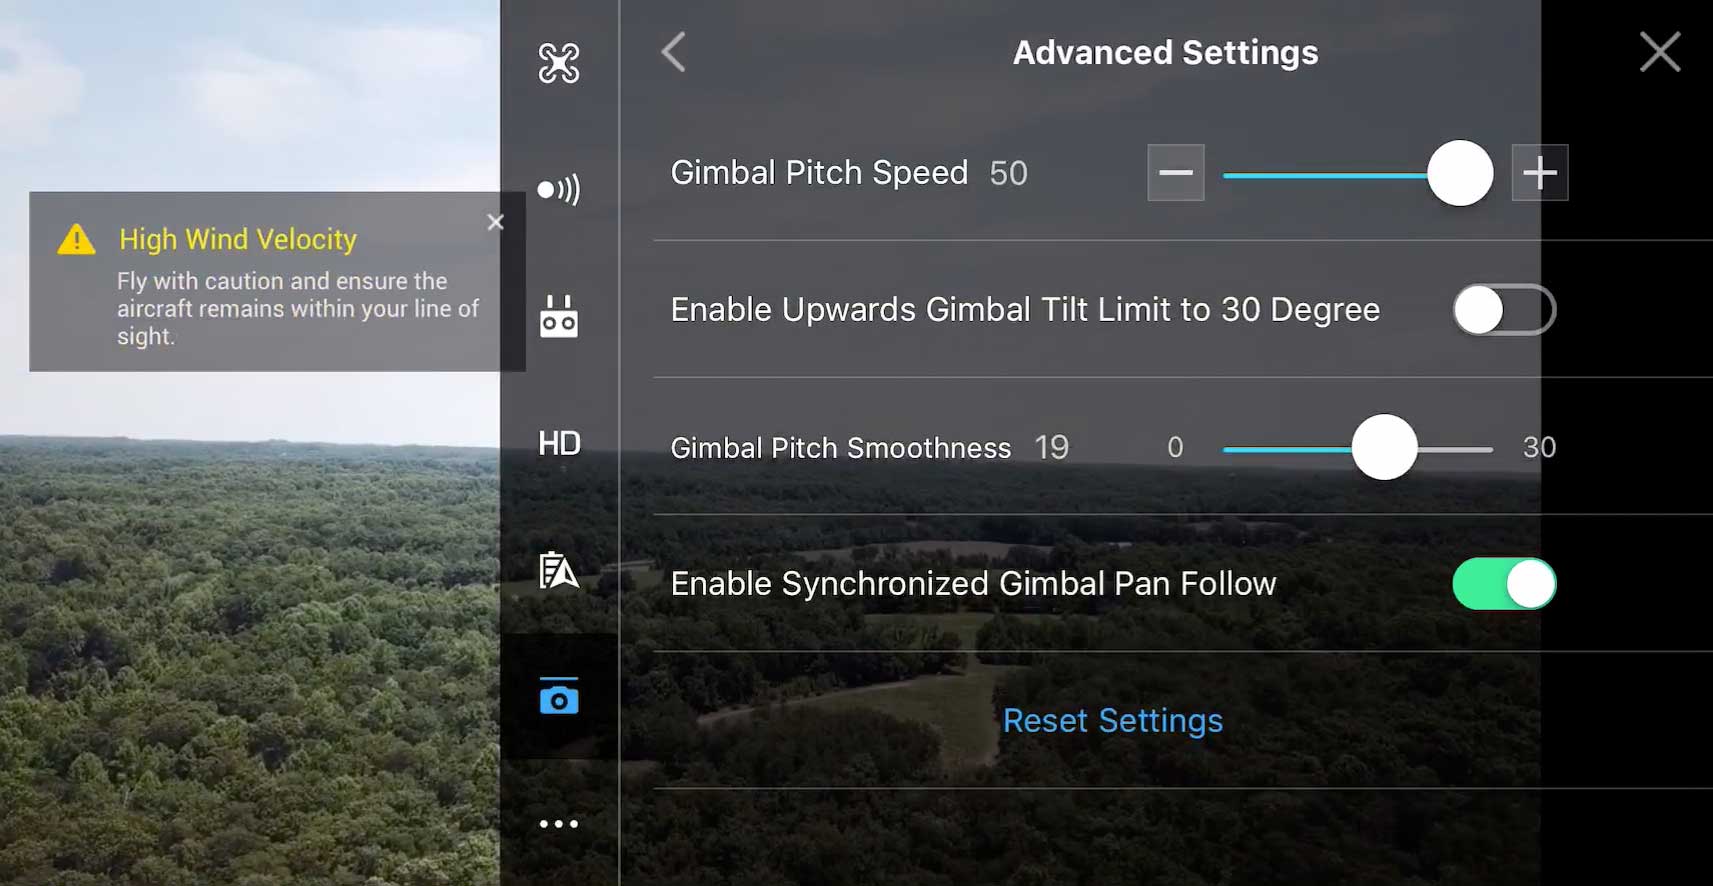
1. Change Your Gimbal Sensitivity
One of the first things you might notice while filming with your drone is how quick the gimbal pitch speed is. DJI drones by default have a high sensitivity set for their gimbals out of the box.
To change your gimbal sensitivity on a DJI drone you go into Advanced Settings and modify the gimbal pitch speed and smoothness. This is easily one of my favorite drone videography tips when using a DJI drone. Play with the settings to find a smoothness you like but anything is improvement over the quick default settings.
On newer DJI drones enabling cinematic mode will also decrease gimbal sensitivity.
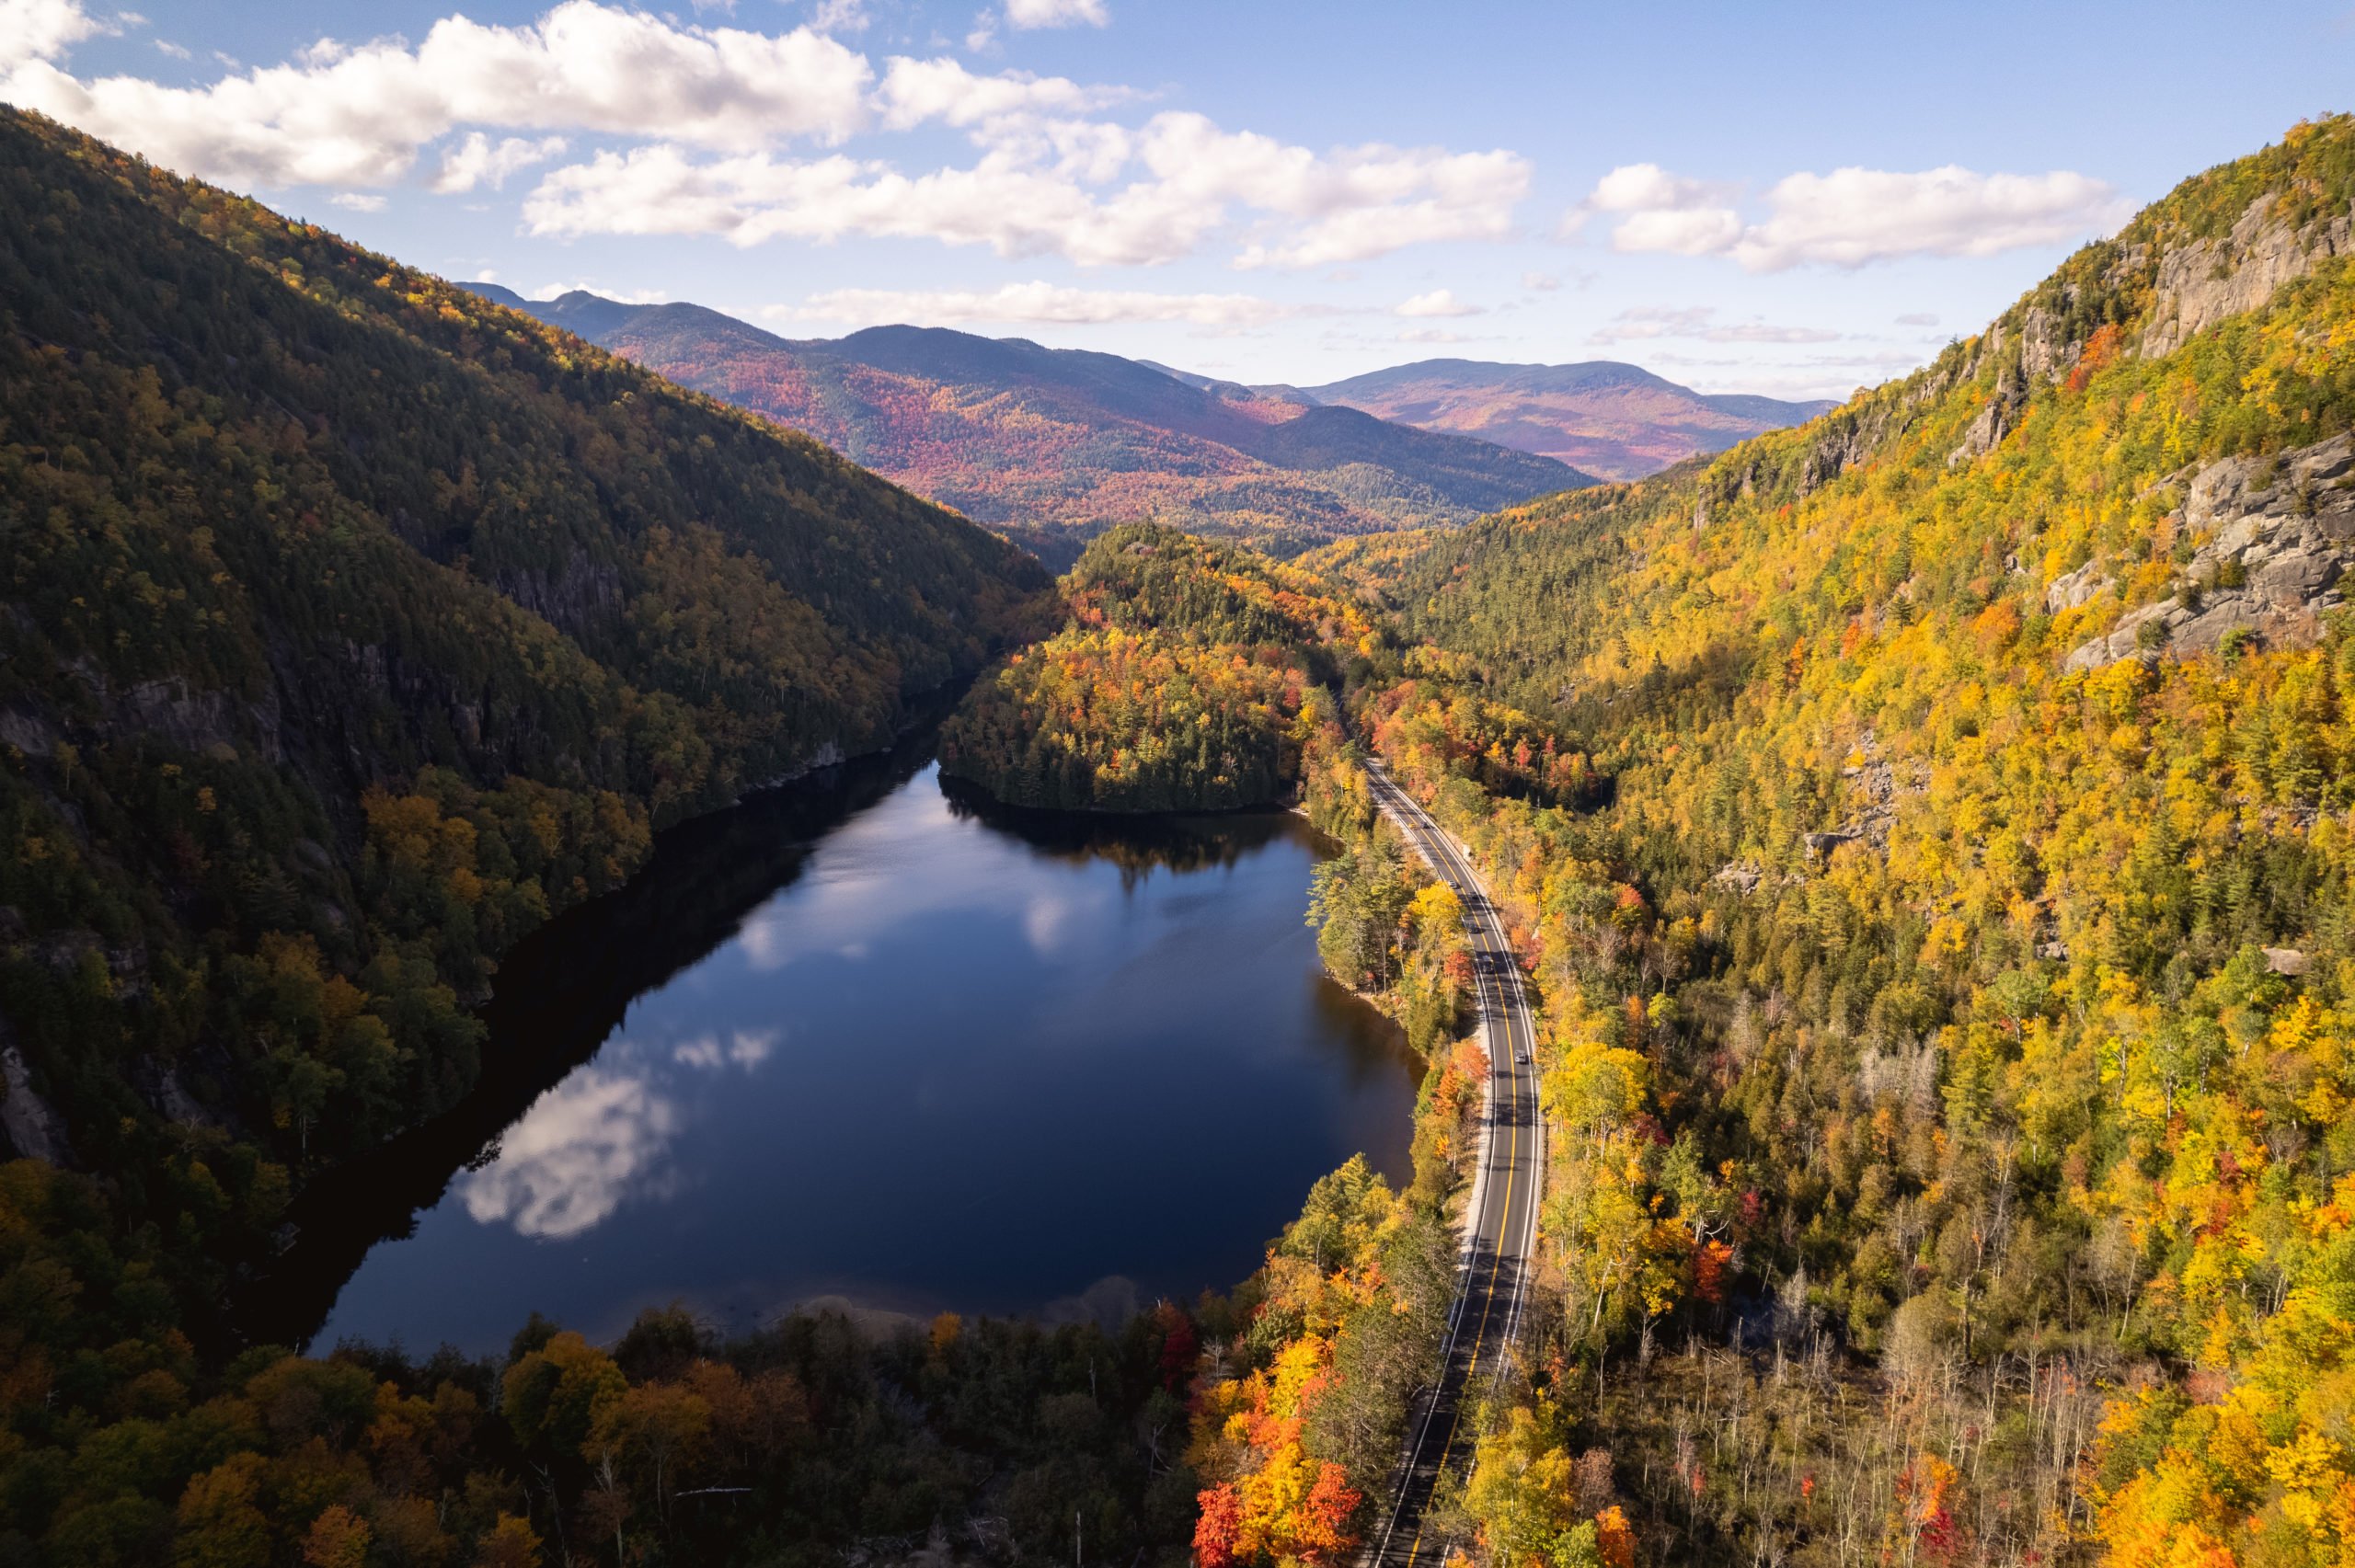
2. Use Simple Angles While Filming
There are plenty of drone filming techniques but the more tilts and twists you do while filming will take your viewer out of the moment. When recording a video on your drone I recommend using simple paths and angles. Simple sweeping and reveal shots will keep your viewer engaged and not make them think they are watching drone footage. If you need more ideas for angles check out this article by Pond5.
Some popular drone movements include:
- Eye-Level to Higher Elevation: Keep your gimbal forward (or tilt it down slowly) while flying up from eye-level to get a simple establishing shot for any environment.
- Gimbal Down to Up While Flying Forward: Start with your drone in the air (above 50 feet) then keep the gimbal down and fly forward slowly pushing the gimbal up to reveal your location. Just be aware of surroundings while doing the movement.
- Gimbal Point Down While Flying Forward: Simple, fly high up then start filming with your gimbal facing down and move forward in a straight line.
3. Use Manual Camera Settings
Your drone video footage will looks much more professional if you are shooting with manual camera settings instead of auto. When you are panning from a darker area to a brighter area auto exposure will make the lighting in your scene rapidly change. This also goes for white balance, combining manual settings and white balance will make the footage of your video appear more cinematic.
4. Use ND Filters on Your Drone
If you’re filming a video using the rule of 2 times your frame rate should be your shutter speed is important. When flying during a sunny day using a 1/120th frame rate for a 60fps video will put too much light on the sensor. This leads to higher shutter speeds that will cause your footage to look jittery.
When filming during the day an ND or Polarizer filter will do wonders for your frame rate and footage. Think of a filter as sunglasses for your drone. I use PolarPro filters on my Mavic Pro which I recommend and come in a few levels of intensity.
5. Use D-Log or D-Cinelike Color Profiles
If you’re going to color grade your footage using D-Log or D-Cinelike will give you a flat color profile to give you the full potential of your footage. This is a great solution if you plan on editing your footage to add color in. If you aren’t planning on editing your footage you won’t want to use a flat profile.
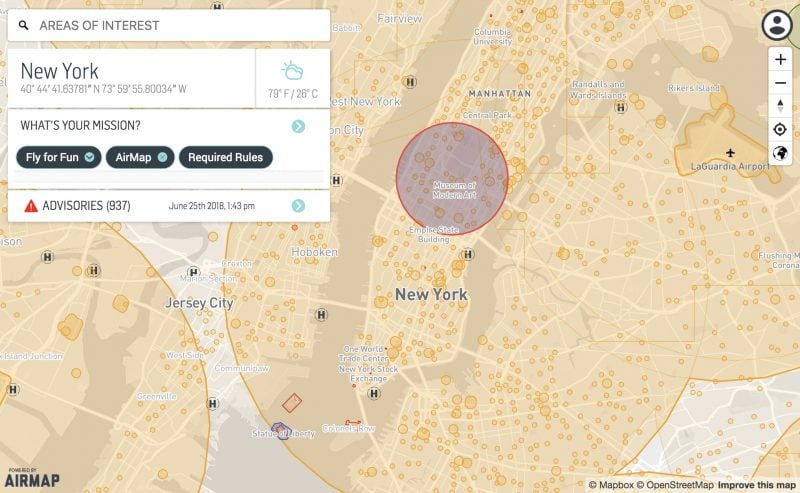
6. Know Where to Fly Using AirMap
There is nothing worse than arriving somewhere to fly your drone and finding out it’s a no fly zone. The AirMap app give you an easy to view map of all the flight restrictions, including schools, prisons, airports, FAA no fly zones, and more. I highly recommend using AirMap to plan your flight beforehand. You can also access AirMap on their website.
DJI has gotten better about showing restrictions in their app as well, just remember to update your drone for the latest restrictions. There also may be places where you aren’t allowed to take off with your drone so just be aware and follow all posted rules when arriving at a location.
7. DJI Mavic Pro Tip: Use Portrait Orientation
This is more of a photography tip but can also be used for filming. If you have a DJI Mavic Pro it’s one of the few drones that allows you to turn the camera into portrait orientation.
Additionally you can map portrait capture option to the directional pad on the controller so you can quickly switch between portrait and landscape capture.

8. Enable Overexposure Warning
It’s impossible to recover detail from an overexposed shot so enabling the overexposure warning in the settings will help to see when you’re overexposing. With this setting on you’ll see a zebra pattern on overexposed areas. This will make it easy for you to quickly identify when you’re over exposing a shot. During high contrasting scenes like Golden Hour and Sunset this becomes essential to properly exposing your shot.

9. Enable Grid Lines
To line up your shots better turning on the grid lines in the settings can help with following the rule-of-thirds. Most drones will let you select different grids to overlay your footage. Of course composition is an essential part of filmmaking and it’s always good to think about where the footage will be used. For example if you’re cropping it for a vertical video having grid lines for that is helpful. Additionally you can turn on a center pointer which helps with keeping things in the middle of the frame.
10. Shoot Using Cinematic Mode
Once you’ve got an idea of what you’re shooting enabling Cinematic Mode in the DJI app will offer smoother videos. Cinematic mode does this by lower the yaw speed and braking distance will be longer. This may seem like one of the most obvious drone filming tips but it took me a few months to realize this feature even existed.
I hope these drone video tips improve your aerial shots. We’ve covered a range of topics including composition to technical details. You can keep up to date with my latest videos on my YouTube channel.
Of course there are more advanced things you can do like building an FPV drone which require much more skill to fly. Personally I prefer the ease of flying traditional drones like DJI drones but you can get unique shots using an FPV drone.
Let us know what drone you’re flying with in the comments!

point number 5 – D-Log or D-Cinelike Color Profiles is totally new to me, so thank you so much for explaining each point in such details, keep up the good work.
Glad it was helpful Manthan!
It’s surprising how many people aren’t aware of the rule of thirds. My brother got his first camera recently and wasn’t aware of that…
And like you said, it’s also applicable for video shoots!
Glad it helped! And yeah lots of new people are always getting into photography so it’s good to remind people of the basics
I have the magic air 2 and love it, still learning everything from flying to camera settings, and even best way to take shots. Need to go to the ocean to unleash what it can do with beautiful pictures and videos